Tuesday, 31 December 2013

Yummy Christmas Decorations

For my last Christmas of the year (and for a little while yet) I'd like to share with you a few of my not so perfect looking, but definitely yummy tasting, Christmas decorations.

Once a month I meet up with a small group of friends to craft together. We take it in turns to hold it at our houses and provide snacks & lunch. In december its normally held at my house so I like to reflect the season in the food I provide.
 This time, for the snacks I made a "Roses tree" a polystyrene tree, covered in green tissue paper & roses attached with a pin after the top twist of the wrapper. This tree was very popular over Christmas and, at the current time of writing this, has been filled 2 & 1/2 times - 1/2 because, as the tree was half bare and there were no more Roses sweets left (it takes almost a whole tin for this 30cm tree), I opened the celebrations & started using those.


I also made gingerbread sleighs to hold Elizabeth Shaw chocolates in. I havent made anything 3d out of gingerbread before & need to find a better recipe as this one was quite tricky and could have done with cooking a bit longer. As you can see, I need to practice my icing technique as well.

 Here is a clearer view of the sweets inside. Elizabeth Shaw sweets (a range of amaretto & mint ones) with layered die cut circles in top & underneath.

Once the gingerbread was eaten they were then transferred to this sleigh.... 
Made using the Sizzix bigz die - Sleigh favor box that I borrowed from a friend. I do love these sizzix dies as you can cut thick card which is necessary when using heavy contents.

Monday, 30 December 2013

Simple Kitchen Decorations (& a tutorial)

Pinterest is a wealth of inspiration, so when I saw a pin of decorated kitchen cupboards I knew I wanted to try & do my own.

I bought some wired ribbon, and raided my box of spare christmas decorations.

 So I can use them easily year after year I attached the ribbon together on the back of the door with a pin
I then set about making the decoration for the front, 2 plastic candy canes glued together using a heat gun, 2 bells, threaded with bakers twine & then hung over the candy canes & finally a bow glued to the front. All this was then glued onto the ribbon on the cupboard door. This was repeated for all of the cupboards that hang on the kitchen wall.

A simple decoration that was quick to make but looks great.

Sunday, 29 December 2013

A Yule Wreath

I currently really like Wreaths, I have one on every door downstairs. Some of these are card Wreaths (Check them out HERE), some made with tinsel, others sticks, the rag wreath you saw yesterday & the latest additions, 2 Wreaths made from evergreens.

It all started at the end of November (cue wavy, wobbly lines going down the screen as we go back in time)...
Our local town park holds the odd free workshop advertised online, this time they advertised a wreath making workshop for children aged 7 and above. Having been to a few of the workshops I got in contact with the organiser & asked (very nicely) if she'd let Kai attend (him being 6, but very well behaved). she remembered us and said he'd be fine to attend :)

On the day a lovely woman & her friend showed us how to make wreaths out of evergreens they'd found in the park (plus a couple of decorative pieces from her own garden). Zack & Kai were allowed to make one each which I really appreciated as they have very individual ideas - & I got to help Kai out :)


Kai's wreath was hung outside the front door & Zacks on the shed door which faces our lounge windows.

I learnt a few things about these natural wreaths rather quickly. If they are hung in a position where rain cant get to them then they need watering every 2 days which can be rather awkward, if they are in a position to be rained on then they are likely to be open to the other elements as well, including wind which can damage the foliage (aka blow it in weird positions & make them fall out); the berries die rather quickly, and a door frequently closed will shake items loose.

They lasted well for almost a month, by which time they need a bit of tarting up. So on our annual Yule walk Kai & I went foraging for evergreens. We only took a small amount from a number of areas but ended up with plenty. So we tarted up the wreaths. Though not as colourful as our previous ones, it was fun to create a new design.


Saturday, 28 December 2013

Rag Wreath tutorial

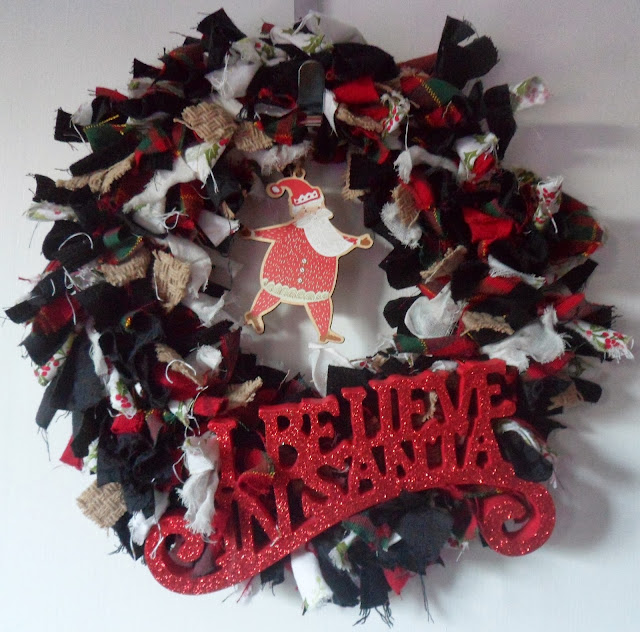
Before Christmas is totally over I'd like to share with you a few of my christmassy makes, starting with a rag wreath.
So how to make it....
Start with some material, these can be scraps, ribbon - I mainly used a christmassy tea towel, tartan table cloth & an old pair of black trousers - a wire ring (or 2, 3 etc attached together), and some decorations.


Cut the material to strips of about 1" by 6", then knot them to the wire ring


Keep going until the ring is full.

At this stage it'll look rather flat, all you need to do is turn a few of the pieces of cloth so they stick out at odd angles.

Finally add your decorations, you can glue them on (glue gun works well) wire, or tie them on. I wired on a "I believe in Santa" & tied on a Santa ornament.

Finally add ribbon to hang it up by.

EDIT: I've been asked where/how I got the wire ring, I got mine from a florists though I have seen them on markets & I'm sure craft shops which have flower arranging items would also have them.
Of course you might be clever enough to make your own with some thick wire & some soldering.

Friday, 27 December 2013

My Secret Santa

For the past couple of years I've joined in Whoopidooings Secret Santa, its always great fun with lovely people


This years was no exception. Christmas day I opened a nice pile of presents from my Secret Santa..


All individually wrapped & gorgeous! Santa must have done some pretty good stalking as they were spot on with these gifts. This photo doesnt show my most wonderful & magical gift though, handmade to such a high quality by my Secret Santa.
A Christmas album. Please click on the pictures so you can get a closer look.

 Flaps to lift up,
 Each of these star punched borders pull out a hidden page from a pocket.


Isnt it wonderful!? I'm a little scared to fill it in-case I mess it up, but it would be a waste not to fill it up, so in the future I shall show you it filled with family traditions, recipes & photos - I dont want to tie it down to a certain year as its something I'd like to be looked at far more often than that.

Finally I opened my card, which included the big reveal of who my Secret Santa is..
A gorgeous, modern day christmas card made with lovely inky techniques.
And who was my secret santa? The lovely Virginia from Celtic House.
Thank you so much Virginia, you have spoilt me & I am in awe of your album making skills.

Thursday, 26 December 2013

Merry Christmas!

To all my followers & readers :)


Or, as I put in this years Christmas card, Mrry Xmas all & a Hppy Nw Yr!
A fitting photo of my technology driven family :)

Wednesday, 30 October 2013

Scrapbooking: Meet My Mummy.

As many of you know, I love Halloween and have always helped my kids get dressed up ... of course that means I get to dress up as well without looking too much of a weirdo, ok, so it means I look less of a weirdo than usual ;)

I couldn't find any Egyptian scrapbook papers, or ones that showed a Mummy on it so I created my own..

Ripped white papers with the edges inked up, stuck onto black paper - I left a few gaps & glues on pairs of googly eyes in varying sizes. The photos are from Halloween night 13 years ago, a 2 year old Zack (almost 3) covered in bandages (sewn onto his clothes so he could put them on & off easily, even sewn onto a pair of pumps & hat) & plastic bugs.

The Journaling reads.....
With Zack in his Mummy costume, clothes with bandages sewn over them, plastic flies & snakes stuck all over, we returned from trick & treating in Duffryn, Hollinswood, the street I'd grown up in & knew the neighbours. Zack had a large bag full of treats & sweets
31st October 2001"

I'd like to enter this into the My Mums Craft Shop october challenge.

Monday, 28 October 2013

Scrapbooking: The greatest view....


...that is the challenge at Jot Magazine, to scrap our greatest view.

It didnt take me long to think of the photo I wanted to scrap, a photo that shows one of my greatest views & most certainly what Kai thinks we all what to see on a photo......


......himself. My lil photo bombing pain in the bum.

I  have started getting into hybrid scrapbook pages - the speech bubble, camera & journaling square are all printed off. It gives me a little more control over colour, style & direction of the item.

The journaling reads...
"Kai loves the camera & will photobomb as often as he can. At times its cute, other times its just plain annoying"

A special thank you to Ruths DD for taking this photo, & yes, that is me in the background :)


Monday, 9 September 2013

Easel Arch Card Tutorial

Welcome, welcome, welcome to my stop on the End of Summer UKS Blog Hop. You should have arrived here from the talented Suzys blog, Sea, Glass & Sand, if you haven't, don't worry, just pop over to UKS HERE for the full list, there are prizes to be won :)

The end of summer means the start of birthdays, the build up to both Halloween & Christmas, sitting in a warm house, crafting away & back to making cards. I've been asked how I make my Easel Arch cards, they are far simpler than they look & can be made in any size.

Whats an Easel Arch card?
An arch card that stands up using the principal of an easel card.

What do you need?
2 sheets of card
An image/topper
Embellishments
Acetate
Sticky stuff (I use double sided tape)
Something to cut with (I use a guillotine)
Something to help you fold (I use a scoring board)
Ruler

How to make the card
Take a piece of card & cut to the size that you want your finished card to be. Then cut the other piece of card to the same WIDTH as this, leaving the length.
Cut the top into a semi circle, this can be with a punch, plate & knife, a circle die half hanging off your cutting plates, a circle cutter, whatever works for you - this time I used a friends patterned circle punch.
Do the same to the bottom of the other piece of card.

Now you need to complete the arch shape, I do this by putting a circular die in the center of the semi circle, cutting it out & then using the guillotine to carefully cut from the bottom up in line with the circle so you get 2 pillars, be careful not to cut all the way - it should end up looking like this...

Now you need a couple of measurements, measure the length from the bottom of the arch to the bottom of the pillar, like this
Its better to be a little bit under with this measurement than over.
Now get your other piece of card. measure 1 inch (2.5cm) from the bottom of the arch & put a fold straight across here. Then add your measurement from the 1st piece of card here & make another fold, add this measurement again after the fold & cut across here to shorten the card (I'll show you a photo in a moment, bare with me)

Take your first piece of card & measure across the pillar.
You need to cut columns the same width as this on your second piece of card. Cut from the top on your second piece of card (the unarched part) down to the second fold on both sides of the card remembering to use your measurement to define the width of these new columns. Then cut along the second fold, in between the columns so it looks like this....
Add sticky to the bottom "flaps" of the columns (from the first fold down)
Stick the acetate onto the back of your first piece of the card.
Then stick this onto the 2nd piece of card, nice side up, so the bottoms & sides of the columns line up like this....
 If you now flip it over & fold it up it should look like this ....
Now you need to decorate it remembering to put 2 raised embellishments in front of the columns, just over an inch from the folds so that they catch on them when its stood up. On mine I used a couple of ribbon roses.

Ta daaaa, you are all done! If you have any questions please feel free to ask in the comments section or click on "Contact me" at the top right of my blog, I'll be happy to answer you.

There are many variations you can make for all sorts of different occasions, you can emboss the card for a different look, remove the acetate & suspend things from the arch, I'd love to see what you come up with so if you do have a go please send me a link so I can see it.

Now on you go with the blog hop, off to Wannabe Rebels blog Scrapbook Printables
Just before you disappear, remember to leave me a comment (as with everyone elses blog) to be in with a chance of winning the prizes on UKS along with your UKS user name.

Linkwithin

Related Posts Plugin for WordPress, Blogger...