Wednesday 18 March 2009

My latest stash

For someone with only staples, poundland & the range to buy craft items from locally at hobbycrafts I was like a kiddies in a sweet shop! It helped to know your prices, & to look round first & then buy, the prices of EXACTLY the samething varied from stall to stall.

I was on the look out for Magnolia stamps as well as letters, & other cute stamps. I also wanted to avoid papers, I have hundreds so want to use a few of those up before getting more unless its for a particular project.

I didnt get any letters as apart from wooden ones, which got expensive with all the ones I needed, & rubber stamp ones, which the ones I liked were expensive, there werent any the right size, guess I'm just too fussy, lol.

Heres what I did buy:
(click to enlarge)
A couple of A4 holographic papers I thought I could use for boxes or on cards, one has babies alphabetical building blocks, & the other is birthday party orientated.
There were so many bargain buckets etc with embelishments & stickers in! I chose
Tiny Angel wing stickers
Tiny Bunneh Rabbits
Black & red Mei flowers
Dovecraft crystal effect letters (3 different sorts)
Dovecraft crystal effect tags
Dovecraft crystal effect baby boy
Dovecraft crystal effect wedding
Dovecraft Chipboard stickers - beach
Dovecraft Chipboard stickers - Love
Dovecraft Chipboard stickers - Christmas
Dovecraft Chipboard stickers - Baby


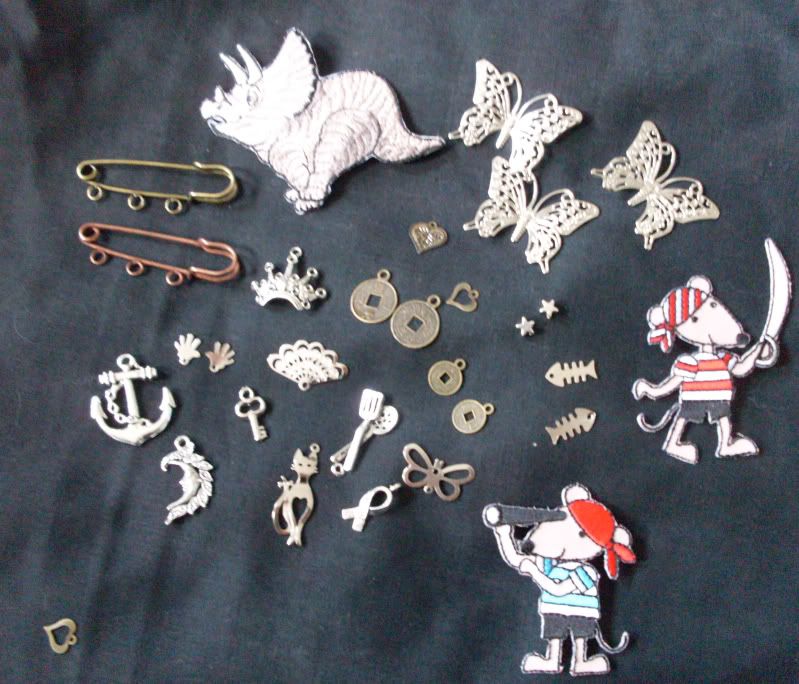
The Triceratops & pirate mice can be ironed onto clothes or stuck onto cards. PLM gave me the fab idea of keeping an eye on any old clothes that my little ones grow out of, any logos, embroidery etc can be take off & stuck in scrapbooks/cards.


The butterflies were 3 for £1
The smallest of charms were 10 for £1
& the larger ones were 5 for £1


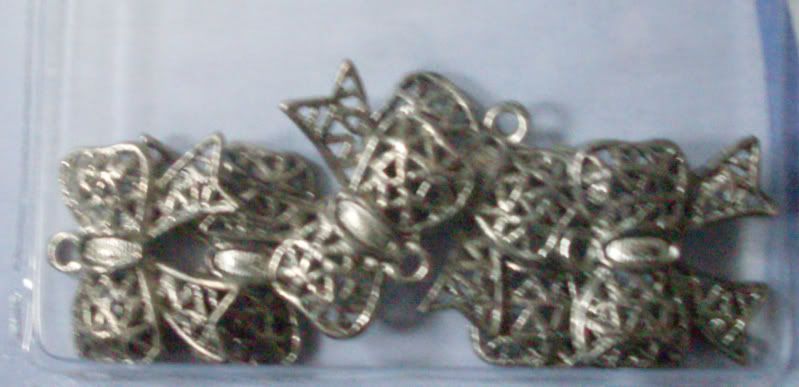
I also picked up a pack of "bows"

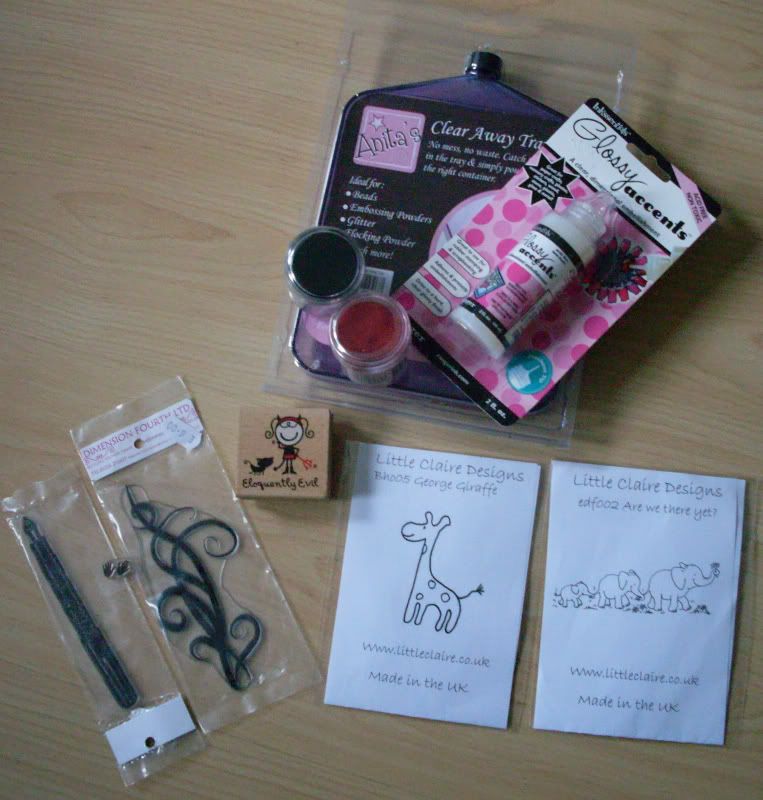
I love stamping, its almost as addictive as collecting pretty papers, one of my fav techniques is powder embossing so i picked up a couple of powders in my fav colours (black & red), & a clear away tray to catch the powder.
I also got glossy accents, I've been meaning to try this out as I think the technique is sooooo effective.
The giraffe & elephant stamps were so cute, & can be used for alsorts of occassions.
The wooden stamp I just thought was fab.
The swirls was bought with mono style cards, or scrapbooking.
The pen stamp I got with the thought that I could write something on a scrapbook, then stamp, emboss & colour a pen, so it looks like its still writing, or just been put down for a moment.
& I got the tiny little hands free, yay for freebies! thast because I spent more than £10 on the 1 stall, I didnt even know about the freebie incentive but was happy to receive it :)

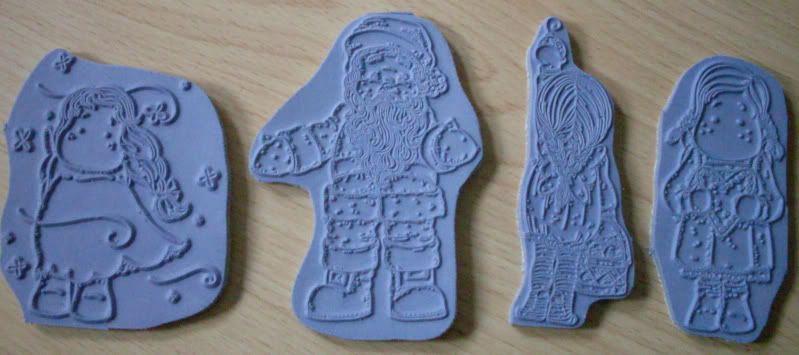
Not only did we find Magnolia stamps, but 2, yes 2 Magnolia bargain buckets!!!
The first little girl reminds me of a windy spring day, or any season depending on the colours I use.
I though Father Christmas was offering a cuddle, very heart warming

But my Fav stash was the items Furry gave me, it was such a surprise, a very nice surprise :) With thought put behind all of it.

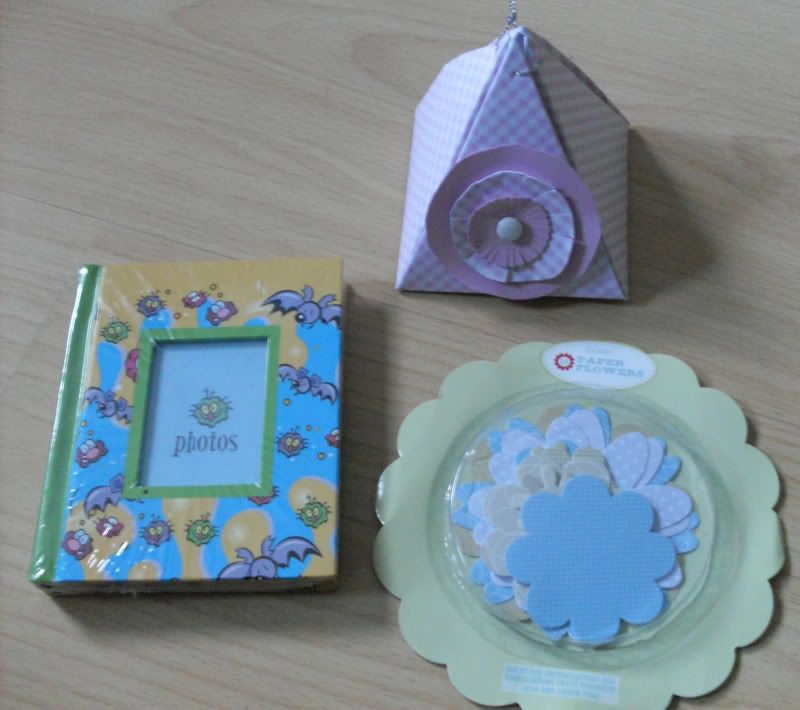
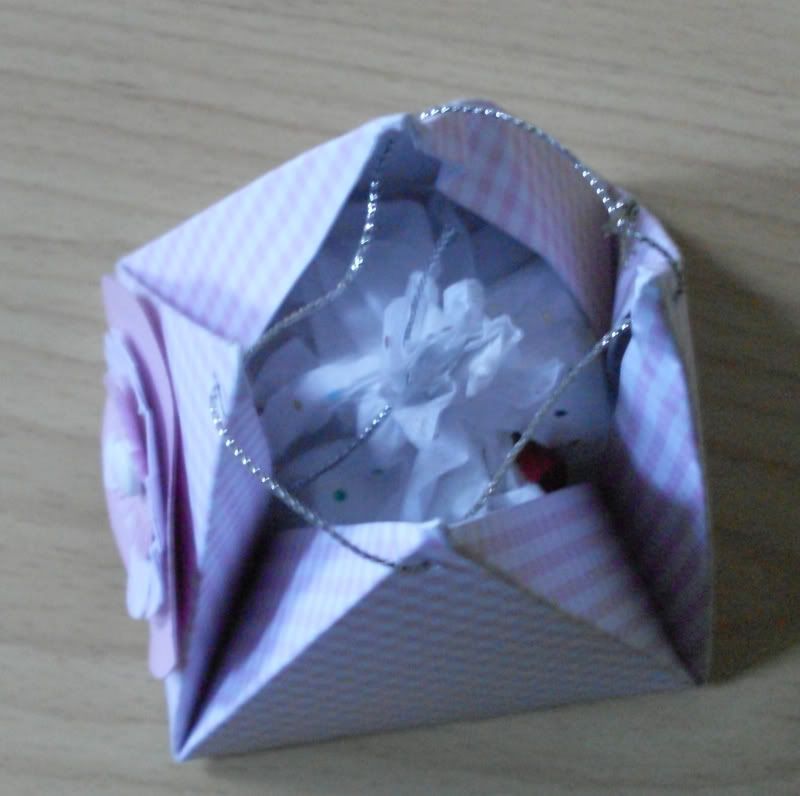
My fav animal is bats, & my lil photo album has bats on it! suits me as I'm kinda batty, lol. & the flower die cuts are fab, specially after what we learnt about neutral tones. I love these pyramid boxes, might make a few for the christmas tree with sweets, or small pressies in. These were even nicer boxes as they has kisses in them!!!
Hersheys kisses, I'd always wondered what they were like as a lot of american sites go on about them, & now I know, yayayayayayayay . Thank you Ruth xx

& finally, favourist, favourite item
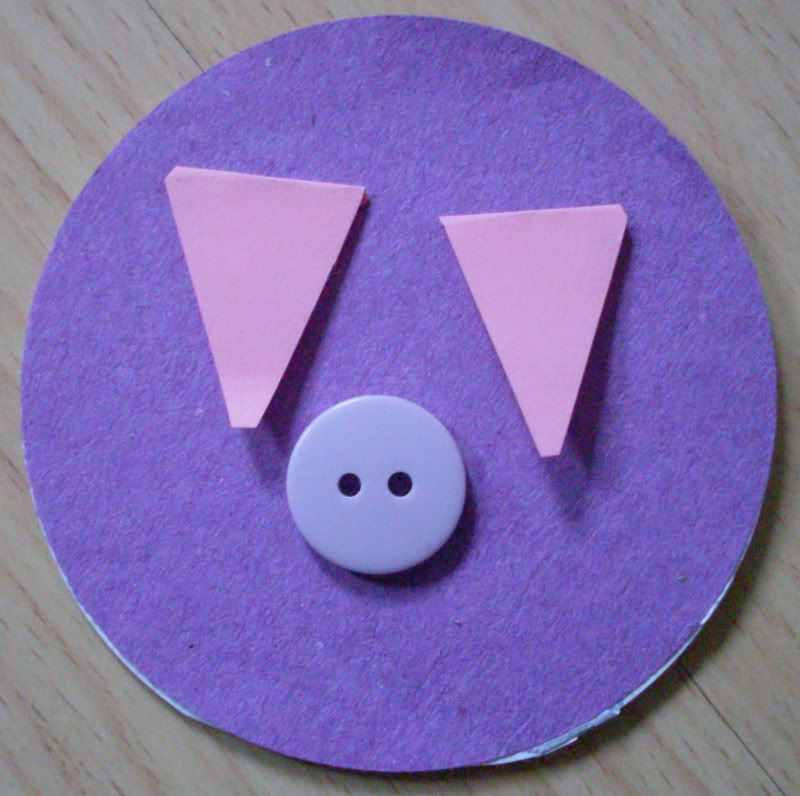
My lil furrypig tag made by Furrypigs talented daughter, with a nice lil personal note in it from Furrypig.

SDU taster session

After reading about the SDU (Scrapbook Design & You) Taster Session on the ICHF website Furrypig, Choccy & myself decided to book tickets.

The blurb read:

Have you ever fancied having a go at scrapbooking, but not sure where to start? Do you consider it too time-consuming or complicated? Are you frightened of spoiling photos or creating your own style? Would you love to leave a beautiful book of memories for future generations?

If you have answered yes to any or all of the above, then why not try our SDU taster session? Scrapbook Design and You (SDU) is a foundation course from EK Success in scrapbook design which takes you right back to the basics. Suitable for beginners, through to experienced scrapbookers… come and join us and discover how you can create a beautiful heirloom to pass through the family. PLUS each student will receive a £10.00 voucher, redeemable against the value of a full SDU programme at stores holding SDU classes (full details available in class).

PLEASE BRING: three photographs, one of a person, one of a holiday and one of an event
."

Queue ideas of scrapping a nice page, picking up tips, possibly a freebie, we can all hope!
Oh no, was basically an £8 advert that we had to pay for the honour to watch!!!


Ok, maybe thats a little harsh, we did pick up a few tips, we kept each other giggling, but it wasnt what we expected or wanted. & to be told we dont need our much loved patterned papers :O shocking!!!!


We were told (in my own words) our scrapbook needs to tell people something for it to last through generations. If you give your scrapbook page to your great, great, great grandchild on their 21st birthday would they know what it was showing them without it needing to be explained to them. The writing needs to say what the picture doesnt, this is explained more in tip 4.


Tip one, match your first mount with whatever you want to show up about the photo the most, e.g. if you want a brides face to be the first thing your drawn to in a photo match the first mount with her skin tone. If its her ruby red lips you want to draw attention to mount on a matching ruby red.


Tip two, mount your main photo on 3 layers, this makes it pop out more, other photos/writing etc can be mounted on 2 layers.

Tip three, write your journal first, not literally write your diary, but whats going on in the photo, or what isnt. This way you know how much space is needed for this.


Tip four, make a note of your senses linked to the photo, i.e, what memories of smells, taste, touch, sight & sound does it bring up. Furrypig also made the valid comment that it can also include emotions.


Tip 5, partition your page so its obvious what writing is linked to which photo, the end of one colour, & the start of another can be made so it goes through a photo & writing to link it


Tip 6, Use the background colours, stickers etc to set the mood, but not wash out the photo. Such as if its a seaside picture you can use pale blues to represent water, but also a little orange/yellow etc to warm the page up & give the feeling of a sunny day.


Any more tips you can think of Furry, Choccy?


Heres one of the photos I took with me, I call it Daddy Domestic

The women running the course chose 1 or 2 of out photos & wrote down questions to prompt us. Heres the ones they asked about this one & my answers:

Who is he? Ryan, my other half.

Who is the baby? Kai, our youngest, only a few days old

Is it summertime? Yup

Are you on holiday? No

Whose garden is he in? Mine (its mine, not his as he's rarely in it)

Does he always do the washing? No way!

Does he like doing it? Not doing the washing, but enjoys having the baby so close

Where was Mummy? I was lying on the sofa due to bein just out of hospital. I had very bad preclampsia & was rushed to hospital, within 48 hours I was induced to have Kai. During a very fast labour I lost a lot of blood, & afterwards my blood pressure stayed high. Fter I was finely released Ry helped out a lot more in the house so I could rest.

One of the women said that the story about what wasnt in the photo made the photo even more special but unless I made a note of it on the page in generations to come they'd never know.


If the course had been £5 or under I wouldnt have minded, but £8 was a tad steep for what we learnt. We did receive a £10 voucher off SDU courses - they arent widely advertised in the uk, online anyway, but cost £175 for a 6 session course. I know I'll enjoy scrapbooking but I would much prefer to ask the talented Pink lady Mel & spend that money on a robo whatsit, lol


Occasions Folder

Yesterday I decided to make a "guide to occasions" folder, make it look nice, unique, & fill with everything I need/use/do for occassions through out the year. Things like christmas cake recipe, how to cook a turkey with variations of times depending on weight, christmas dinner shopping lise etc for christmas, a section for cards, something similar to this, but for through out the year.

SO far I have the outside of the folder almost done, lol. & a few ideas for inside buzzing around my head. I want it to be done to last my lifetime, something I can keep adding to, then hopefully my children will continue it & their children, & their children etc.

Collecting ideas of it in my head has made me think of my Nan, she was an amazing cook. I always looked forward to going round for a meal, it was always either something from the chippy (we didnt have ANY kind of takeaway very often) or a buffet style FEAST. First the 3 leaf table was filled with savory food, I couldnt tell you what half of it was, high class scrummyness all made from hand.
Then when we'd done with that it would be filled again with deserts, belgian biscuit cake, trifles (yes, plural!), truffles, jelly, icecream...I could go on & on.
Happy Memories, of picking what I wanted, multiple puddings, feeling stuffed to the top, the warmth from the electric fire, the slightly musty smell of a room barely used, family all round.

My nan was from a "well-to-do" family, in an era where things had to be just so. Where all little girls were taught to sew, knit, crochet, cook, clean. When she was in her 80's she'd still get on her hands & knees to polish her varnished staircase, clean the house from top to bottom without any help, & do all the other chores she always had done.

The sad thing is those days are over, & there is no way it can be recreated. Its not just because my grandparents are now gone, its also unlikely the pages of her recipe book that she kept all her amazing recipes in will see the light of day for another 30+ years. One day my younger brother will inherit it, but until then it will sit on a shelf in a womans home who will not use it, or let anyone else touch. It sits there like a trophy, a prize of power, not a treasured item of memories.

I have a few recipes from it, ones my mom copied out before she left home into her own collection of recipes. These will be included in my folder, along with some of my moms, a piece of the past to pass on to the future, a way to keep my memories, those special feelings alive, and to allow another generation to have their own special memories.

Monday 16 March 2009

ITNG painting

For his 2nd birthday I'm changing my sons Winnie The Pooh themed bedroom to In the Night Garden. His room is basically white with a pale yellow wall. To give it a WTP theme he has a WTP Rug, curtains, paintings, poster, stickers on his tubs, height chart, clock, bedding (including headboard & head bumper), door plaque & cuddly toys. All these will be replaced in some way with In the Night Garden products. HOWEVER, these cost a bomb, all you need to do is see "In the night garden" on something & you can add £10 to the price, so I'll be looking for the cheapest way to replace them while maintaining quality.

I have so far bought a rug & clock through a catalogue with cashback via the same catalogue. I looked up the prices of the official curtains & bedding, the prices shocked me! Even on ebay they were pricey, except I found a seller who I could buy 3 ITNG duvet covers from for £30 including P&P. I can use these to make the 3 curtains I need, cot bed sized duvet covers, & cover the headboard. If theres any left over I might make a laundry bag &/or back pack.


I decided to make a start on the paintings. I bought a couple of canvas' from poundland, they're not as smooth as more expensive ones, & are a tiny bit loose, but were perfect for what I wanted. I googled for some piccies of the characters of ITNG & chose two of my favourites.

I edited them a little with adobe paintbrush and printed onto A4 paper. I then scribbled over the back with a soft pencil.. I turned it over, positioned it onto the canvas & carefully drew over the lines.

This left the image on the canvas which I went over all the pale lines on. Now the fun part PAINTING! I started with the background & tried to build it up from the items that were furthest away to those closest. This way I didnt need to worry too much about going over some of the lines as I could paint over it.

Each time I finished with a colour I would cover the pot in clingfilm incase I needed it again for another part or touch ups.
So these paintings:
Are being replaced with these two bigger ones:

Next on my list is to make a foam door plaque.

K's Crafty Corner

In an attept to be a lil more organised I am spliting my old(ish) blog down the middle - this is the crafting area.

An area for me to show off my crafty buys, my stash, & my makes, along with anything else crafty :)

Linkwithin

Related Posts Plugin for WordPress, Blogger...