Wednesday 29 June 2011

Mmmmm Quiche Lorraine

I've recently got a boost in my confidence with cooking so I'm cooking from scratch a LOT more. It can be hard to cook healthy meals that all 3 of my lads enjoy, the FEAST bus has helped out quite a bit with this. For those who have asked about the FEAST bus I'm planning on doing a blog post about it either this week if my camera (which Kai tried to take a picture of IN the paddling pool) works tomorrow, if not it will be next week, all shall be revealed.

Currently the papercraft projects I'm working on cant be shown so you'll have a few recipes I've used over the next few days to browse through.

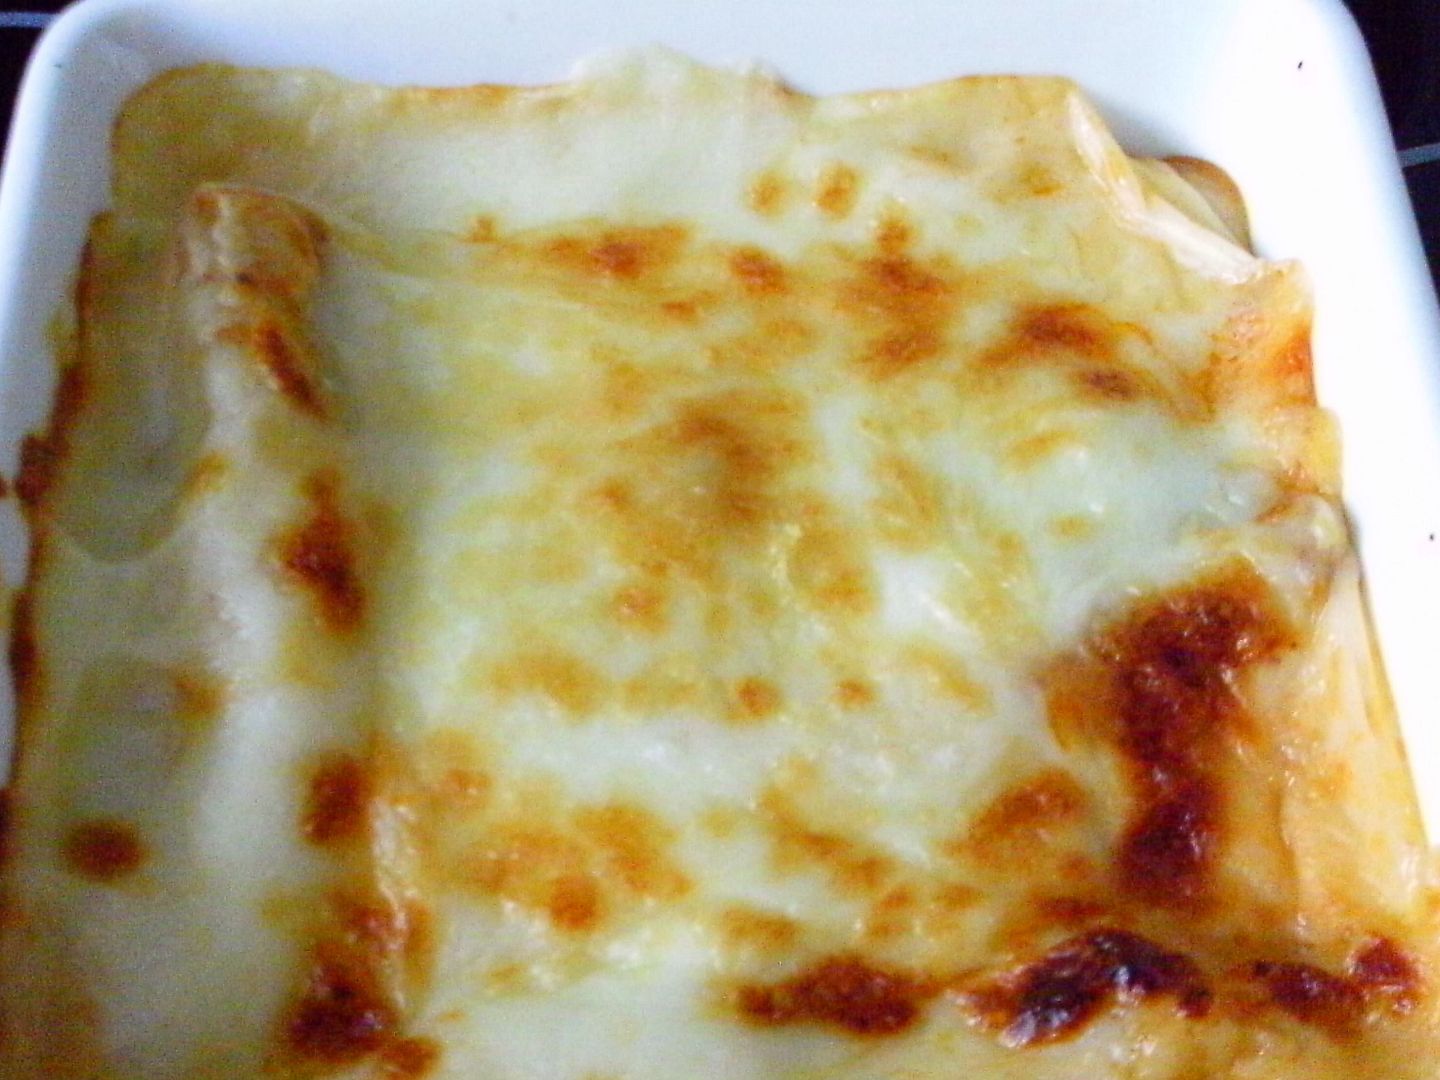
I have cooked Quiche Lorraine twice now for my family & they think its delicious. I do it with a shortcrust base but non on the sides. Its a large quiche which not only does us as a warm tea but also as a yummy lunch the next day, or a couple of days after (it keeps well in the fridge & I personally find it even nicer cold).


first off .... The Pastry
175g/6oz plain flour (plus extra for dusting)
salt
75g/2¾oz butter (plus extra for greasing)
Water

To make the pastry, sift the flour together with a pinch of salt in a large bowl. Rub in the butter until you have a soft breadcrumb texture. Add enough cold water to make the crumb mixture come together to form a firm dough, and then rest it in the fridge for about 30 minutes wrapped in clingfilm.

Preheat the oven to 190C/375F/Gas 5.

Roll out the pastry on a light floured surface and line a 24cm/9inch well-buttered flan dish (I actually used a spring form cake tin, it worked great).

When cooked the base can bubble & rise a bit ... I dont mind this but if you do line the base of the pastry with baking parchment and then fill it with baking beans. Place on a baking tray and bake blind for 20 minutes. Remove the beans and parchment and return to the oven for another five minutes to cook the base

Now for The Filling
250g/9oz English cheddar, grated
4 tomatoes, sliced (optional) or a few cherry tomatoes cut in half
200g/7oz bacon, chopped (bacon bits is a cheap, easy product to use)
5 eggs, beaten
100ml/3½fl oz milk
200ml/7fl oz double cream
freshly ground black pepper
2 sprigs of fresh thyme

Reduce the temperature of the oven to 160C/325F/Gas 3.
Sprinkle the cheese into the pastry base and add the sliced tomatoes if you are using them. Fry the bacon pieces until crisp and sprinkle over them over the top.
Combine the eggs with the milk and cream in a bowl and season well. Pour over the bacon and cheese. Sprinkle the thyme over the top.
Bake for 30-40 minutes or until set. Remove from the oven and allow to cool and set further.
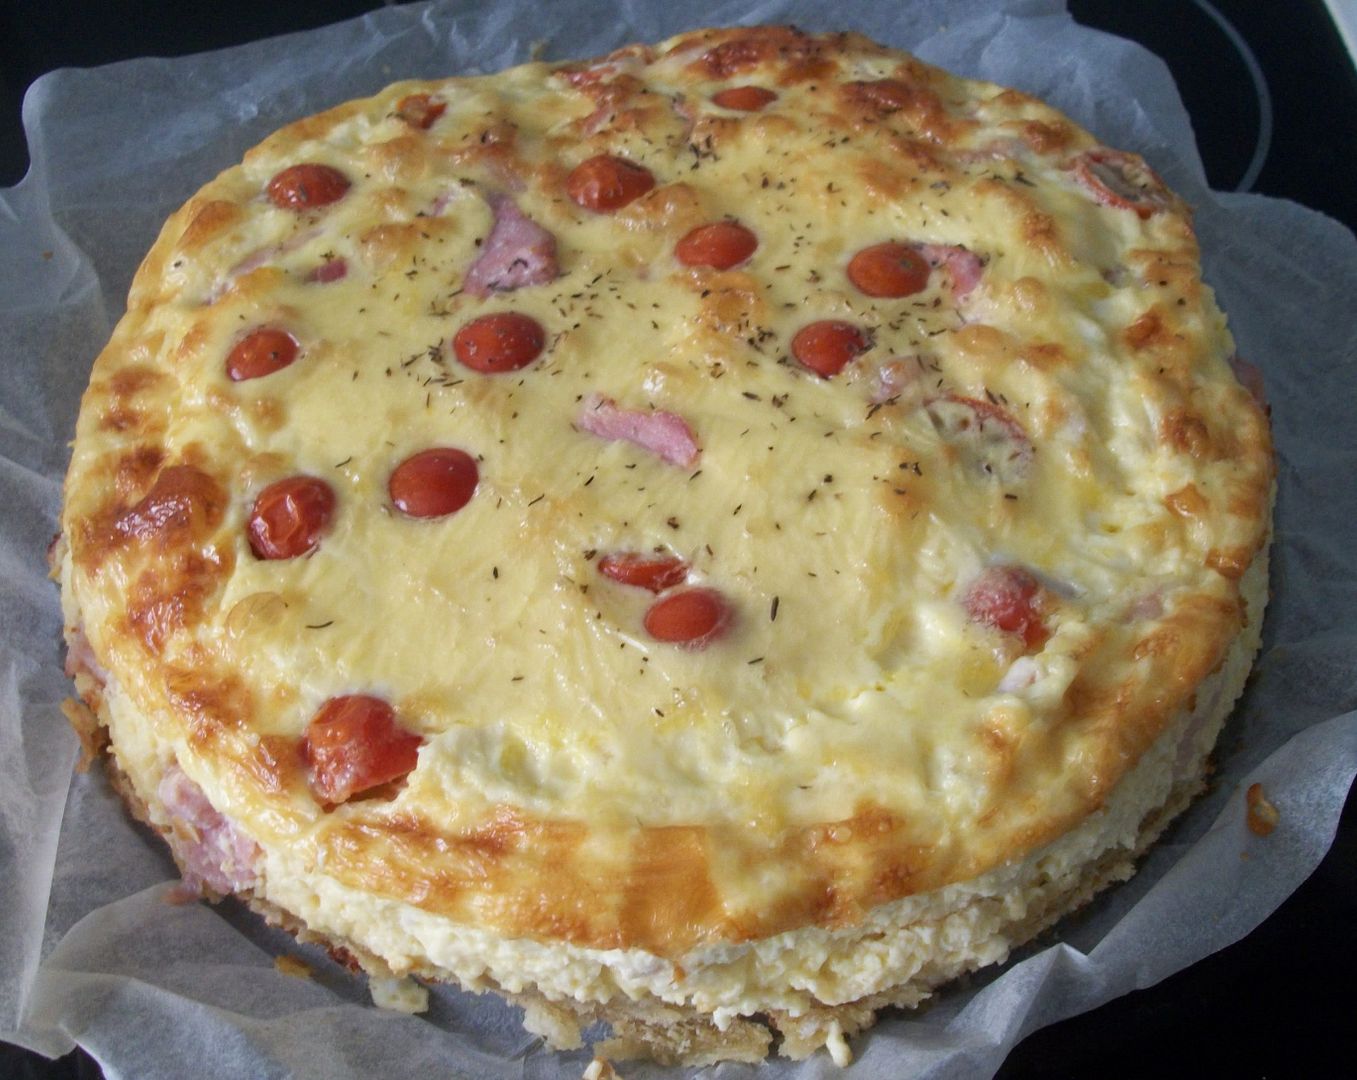
I personally think this far surpasses any I've bought flavour wise, even if I do say so myself :-)

Friday 24 June 2011

Rocking My World Friday

So I'm running a lil bit late with this but lets pretend I'm on time ;-)
This weeks been rather busy, jam packed, and my calendar is filling fast.

  • Though around Fathers day is always rather hard for me. I try & put my thoughts to one side so my children & Other Half  have a fun day. This year Ryan made a Lemon New York Cheesecake which was delicious, & very nice that I didnt have to cook that evening due to him making pub & us having chinese as a treat.
  •  
  • I went on a school trip to Cadermill Valley with Kai's class. Even sitting in pouring rain under a parachute to eat lunch was fun (stingey coach driver wouldnt let us eat on the coach, even though he was :-O It was a jam packed day with lots of lil cuddles, slipping onto my bum, tub boat races & the best bit PADDLING in the streams.
  •  
  • Again, cuddling on the sofa with Ry is definately high on my positives this week, lovely to just chill out together infront of the box together
  •  
  • An even fabber session on the Feast Bus, both cooking & chatting with the ladies on board, only 3 of us this week (plus the *teacher*) & we finished earlier than expected so we sat & had a cuppa
  •  
  • The lovely support I get on here in the comment box **mwahhhhhh** to all my followers (especially those who comment ;-)
So what are your positives of the week? If you fancy joining in link up on Celtic House.

Thursday 23 June 2011

Cot Bed Creations .... Part 4

This week I'm showing what I made out of Kai's cot bed that broke
On Sunday I gave the picture clue....

We had a move round of our bedroom, now that the weather is sooooooo much warmer we prefer to sleep closer to the window. Unfortunately it means the view as you walk into the room isnt as neat as I'd like...
Ryan & I began discussing chinese screens to hide it, far too expensive to buy but with the simplest ones being a basic frame, material & hinges I thought I could probably make one. Then **TING** light bulb moment!!!!

My new chinese screen!!! made from the cot sides, 3 hinges, cot feet, a duvet cover & tacks.
I love how the light shines through & shows the bars of the cot, it remonds me so much of the traditional chinese sliding paper walls/doors you see on tv.
Have you noticed my pouffes? Also covered with the duvet cover to match.

View from the bed.
A few close ups .... click to enlarge.


The duvet cover was bought by Ryan one day when we were out browsing the shops, not long after we'd started seeing each other, when I spotted it in Next & said how nice it was. Unfortunately it was waaaaaaaaay more than I'd spend on a quilt cover, next time I saw Ry he had bought it for me :-)
The buttons to do it up had fallen off (lazy me for not sewing them back on) and it was starting to wear, so this has given it a second life.

The pouffes my Grandad made when I was younger - every now & then I'll recover them when the covers wear or to match the room.

So not only is this probably the BEST looking thing I've EVER made, but they also mean a lot to me as well. 1 chinese screen & 2 pouffes that cost me nothing, I already had everything I needed in the house.

To see what the cot bed originally looked like check out THIS post, also to see the rest of the picture clues.

Well I hope you've enjoyed seeing what I've made from Kai's cot bed this week, and that I might have inspired you to recycle some of your own furniture.

Wednesday 22 June 2011

Cot Bed Creations - part 3

This week I'm showing what I made out of Kai's cot bed that broke
On Sunday I gave the picture clue....

Kai's new bed is a mid sleeper, meaning its about 120cm high, so he'd have more floor space to play on. He lost some storage space underneath his cot bed so I decided to make him something for his books and toys underneath his new bed. The only wood to hand was Kai's cot bed & some off Zacks bed (he also had a new one bought him)

sorry about the bad photo but it was a blumin' ackward photo to take!
I took the feet off the 2 end pieces of the cot bed and then cut these pieces in half width ways. To this I attached wood from Zacks bed for shelves. I also made a cube which was then attached to the cot bed sides, this was to house the draws along runners.

Tomorrow you'll find out what this is..

To see what the cot bed originally looked like check out THIS post, also to see the rest of the picture clues.

Tuesday 21 June 2011

Cot Bed creations - part 2

This week I'm showing what I made out of Kai's cot bed that broke
On Sunday I gave the picture clue....

I bought a very cheap shoe rack a while ago ..... big mistake! It went flimsy very very quickly
& because of that (& lazyness) nobody usually uses it

so while moving the cot base I had a light bulb moment.

Using a saw, a hammer & a few nails....
..it became a new, 3 tier shoe stand with a tub for seasonal hats, scarves etc. It is sooooo much more study than my original stand.

Tomorrow you'll find out what this is..

To see what the cot bed originally looked like check out THIS post, also to see the rest of the picture clues.

Monday 20 June 2011

Cot Bed creations - part 1

This week I'm showing what I made out of Kai's cot bed that broke
Yesterday I gave the picture clue....

I took the side pieces off the cot bed, lovely straight, thin pieces of varnished pine, perfect for.....
Shelves

Starting off simple, 2 pieces of wood off the cot bed, 4 brackets, 12 wall plugs & 24 screws equals =
2 shelves I put up in Zacks room for him to put some of his Dr Who figures on.

Tomorrow you'll find out what this is..

To see what the cot bed originally looked like check out THIS post, also to see the rest of the picture clues.

Sunday 19 June 2011

A Sneak Peak of Whats To Come

Next week I'll be showing you what I turned Kai's cot bed into with the help of Zacks old bed as well.
Kai's bed broke and though I could fix it would need to have quite a bit of money spent on it to make it stronger, so we might as well but him a Big boy bed.

Unfortunately I didnt think to get any proper "before" photos having thought there would surely be some in the mass of photos I have of Kai .... unfortunately not of the whole thing, so here are some where you can generally see what the cot bed looks like...
In its cot form.
In its bed form.
 As you can see the wood is lovely so there was no way I could just throw it away. The colour is lovely, in most parts it was in great condition & its very good quality soft wood, so I recycled almost all of it.

So, a few sneak peek shots of whats to come
                                                     
1.
 This ones not particulary hard to guess (please excuse the quality of the photo, having to use Zacks camera as mines on loan & I cant get a hang of the settings etc)

2.
A bit harder but the clues in the picture

3.
This one is mighty tricky to guess

4. 
& the piece de la resistance, my most favourite item I have EVER created.

So any guesses to what I've made? (I know a few of you have already seen what number 4 is so pleeeeeeeeease dont give the game away but feel free to brag & gloat that you already know what it is ;-)

Saturday 18 June 2011

A Canneloni Experiment

My other half made us Spaghetti bolognaise for Tea one evening, knowing I frequently batch cook bolognaise he ensured there was plenty ... did I say plenty? I meant LOADS! I usually freeze the bolognaise in tubs to defrost & use in either lasgna, canneloni or as a meat ball sauce. This time we'd somehow got a tub shortage, where do tubs disappear to? So after racking my brain for a little while I struck upon an idea .... fill each canneloni tube with the bolognaise & then freeze, spaced out on a tray so I can later put them in a tub. I thought that when needed I could take out the required number, defrost, add cheese sauce & bake.
Canneloni on a tray thats been covered in baking paper, ready to freeze.

Frozen canneloni transfered to tub for ease of storage.
In the morning I decided it was a canneloni day & took out the specific number I wanted to defrost, woohoo, they werent stuck together!!!! I placed them in heatproof square dishes & left them covered until evening, by this time they were fully defrosted & ready for a cheese sauce. The only problem I had was if there was a crack in the canneloni, when it thawed this opened up even more - only really a cosmetic problem.
Cheese sauce made, poured over, a small amount of grated cheese sprinled ontop before bunging it in the oven.

They were a HIT!!! When cooked the gaps in the canneloni are totally un-noticable, they taste the same as when made fresh - definately a time and waste saving endeavour that I shall be repeating.

Friday 17 June 2011

Rocking My World Friday

Life has been rather busy lately, mainly due to illnesses & the half term holidays. I'd like to say things are settling down but with a little one off with a Tummy Bug it hasnt got there yet. Its when times are this busy that I think we can miss out on the little positives that make life so worth while so I am taking a moment out to highlight mine.
  • Giggling with a good friend on the phone for hours having not spoken properly in months.

  • My youngest being so brave with a tummy bug he's had this week, he didnt cried once yet was quite violently ill at times.
  • My eldest for being very sweet to my youngest while he's been so ill including looking after him 1st thing in the morning so they didnt wake me up.
  • I started a little cooking course that shows how to cook healthy, nutricious food - its on for 6 weeks. We made pizza totally from scratch with a  tomatoey sauce jam-packed-full of veg that can be used for pizza's, a bolognaise base, a pasta sauce, chilli con carne base etc etc etc. I'll share with you the recipe soon.

  • Being able to go to, participate & chat on the course, theres 5 of us attending, & though this isnt a big thing for most people, a lot of you will realise what a step this is for me.
  • Not only that but I also went to a picnic at the school today, something I normally avoid due to the large volume of people but it was lovely & sooooooooo shows that my new tablets are working :-)
  • Finding time to craft
  • Date night!!! My other half & I have very different interests so will frequently spend time in different rooms, or in different "worlds" rather than engaging with each other properly in an evening (though we always chat while I'm cooking tea & before we fall asleep) so we've set aside saturday evenings to have our meal together after the kids go to bed and then cuddle infront of a movie. Its something we both look forward to now.
So there we go, another week almost over, this is probably one of my few quiet weeks left, being the last half term of the school year my diary is filling up fast with quite a few things to look forward to.
If you wish to join in please link up at Celtic House :-)

Thursday 16 June 2011

Bunny Day

A simple page to commemorate our family gathering, the day before easter sunday, inspired by (obviously) eggs.
I started out with a sheet of egg patterned paper and used this to dictate the colour scheme.
The journalling is written on a piece of lilac paper that I cut into an egg shape.
the egg shaped photos are mounted onto egg stickers & then onto the same yellow card as the large photo.

Wednesday 15 June 2011

Lipstick DIY

Have you seen the new advert by maxfactor with the lip pen? Well Kai had the same idea before he even saw it.....

The Journalling reads..
"I still don't know how you managed to apply pen to your lips so neatly without a mirror"

Thankfully all Kai's pens are non toxic but I wonder how many children will use their own oens to copy the advert?!

As the pen was red I decided to use random red objects to highlight the colour (inspiration from Gauche Alchemy kits), as well as the title. I used a pen to follow some of the pattern on the background paper to add a bit of a border and pull the page in a little. I also mounted the photo to make it show up a bit better.

Tuesday 14 June 2011

Super Scooter

Inspiration is hitting me in dribs, drabs & droplets so though I'm creating its a tad slow & hasnt hit me in the wave I'm used to ..... with practice I'm sure it'll flow though, I'll keep on plodding.

I started off with a very simple layout, crisp clean & I actually really like it...
The little black scooter is made out of a letter t, the centre of 2 O's, a i without its dot & a -

The journalling reads..
"The kids went out on their scooters, Kai for the first time. A lot of the time I was carrying his scooter but when he was on it he quickly improved his balance & got the hang of scooting along."

It took a mere 30minutes which is SUPER fast for me.

Wednesday 8 June 2011

3+ Brads

Its challenge time again over at CCW & I was asked to be a Guest Designer - yay!
Perfect timing as it was also my nephews birthday so a card was called for.
I photoshop'd an image of Thunderbird 3 to change the numbers 3 to 7 to match my nephews age. I also downloaded the Thunderbirds font to write "Birthday".
Having printed it out I then mounted it twice before applying the brads & eyelet .... here I came upon a problem, I didnt have any that actually matched the colour scheme :-O Hellllllloooooooo can of red spray paint :-D The brads took the colour nicely & with a light coat the eyelet showed a hint of navy through on the dips which went nicely with the navy mounting.
Having attached the brads & eyelet I could finish off by fastening it all to the card, hiding the slightly unsightly back.

So whats the Creative Craft World Challenge this week? To use 3 or more brads on a card ...  its a simple challenge that I'm sure many of you can join in with so why not ..... especially when it gives you the chance of winning 5 promarkers!!!

Also go take a gander HERE if you fancy being a Guest Designer yourself :-)

Thursday 2 June 2011

Scrapinspire #3

Yet another new month is upon us and my crafting mojo seems to have got up & gone .... or maybe its just being expressed in less paper based ways, in May my hair went from BRIGHT red, to pink & purple & is now a mixture of blues & greens.

But I digress, back to scrapbooking. Having not done a page for about a month I thought I better try kick starting myself & try to get the flow going again. I got out my scrapbook albums & started sorting them out, making sure they were in chronological order. I then sat with my notepad sorting out my photos into chronological order, jotting down any inspiration that I got from the photos. Sometimes its just a title, other times a layout or possible embellishments to include. As of yet I havent got an idea for a full page so my next stop is the internet. theres are so many sites out there to flick through & get a few ideas. Through out I'll be keeping my eyes open on potential layouts EVERYWHERE - how magazines set out their articles, dvd covers, recipe books etc etc

So, inline with finding inspiration this months task is to make a scrap page that was inspired by something you've seen .... & please remember, if you do any scraplifting please link back to where you got it from.

Linkwithin

Related Posts Plugin for WordPress, Blogger...